We could earn a fee from hyperlinks on this web page.
Though the follow of constructing strong blocks of soil for rising seeds isn’t new (it might return over 2000 years), soil blocking has gained reputation in the previous couple of years. It’s not a sophisticated course of: You type blocks of compressed seedling combine, lay them out on a tray, then plant into them. It really works very similar to rising seeds in a plastic seed tray, with out the tray. Utilizing much less plastic is just one profit—the actual cause individuals love soil blocking is that it creates seedlings with extremely sturdy root methods, with out getting root-bound. The air across the block acts as a pruning mechanism; the roots develop to the sting of the soil after which cease. The roots maintain the soil block collectively, and will be simply up potted to proceed rising inside, or transplanted straight into the backyard.
The drawbacks to soil blocking
So as to make seed blocks, you want soil that can compress effectively and maintain collectively, and most frequently, that includes peat. Peat, a byproduct of swamps and bogs, is controversial as a result of the harvesting has a dramatic environmental influence. Some individuals have had success with different mediums like coconut coir, however these individuals don’t embrace me. I’ve tried coconut coir just a few years in a row and have suffered from lack of germination and blocks falling aside, so I’ve gone again to seedling mixes with peat.
The opposite main disadvantage to soil blocking is the precise blocking: It’s a ache within the ass. My first yr, I used to be impressed by one in all my gardening mentors, Meg Cowden of Seed to Fork, who speaks of the calm and meditative nature of blocking. Now, I regard blocking as a needed evil every year that takes quite a lot of vitality and soil. Nonetheless, the outcomes converse for themselves. Soil blocks carry out exceptionally effectively in exams towards seed trays.
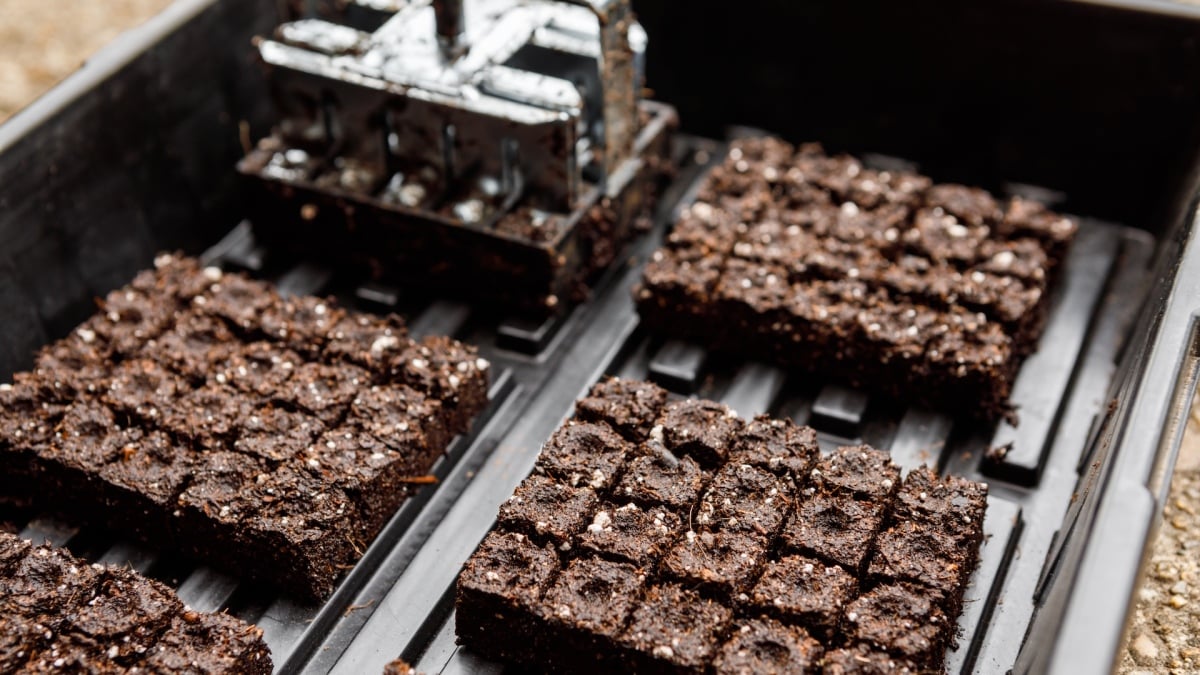
The first step: Get a soil blocker

Credit score: Amanda Blum
The very first thing you’ll want is a soil blocker. There are all types of blockers in the marketplace now, and plenty of are cheap. Soil blocking is just like making a sand fortress or snow fortress: You pack the soil tightly right into a dice; the soil blocker compresses the dice, and helps spit it out. Soil blockers come in several sizes and layouts. There are mini blocks, that are an inch or so massive (for flowers), and maxi blocks, that are 4 by 4 inches. However most individuals are going to wish to begin with two-by-two-inch blocks. A fundamental blocker will spit out 4 of those blocks without delay.
Step two: the precise seed combine, on the proper moisture stage

Credit score: Amanda Blum
Subsequent, you’ll want the soil. Totally different sorts of crops at totally different levels all want totally different soil. When beginning seeds, you need seedling combine, which is devoid of vitamins, has quite a lot of moisture retention, and is made from effective particles, so it may compact into seed trays. That is good for seed blocking, so long as that blend additionally consists of peat or coconut coir. Get extra soil than you assume you’ll want, since by compressing the soil to make the block, you utilize extra soil than you may with seed trays. I used to be in a position to make 100 blocks from a 12-quart bag.
Empty the bag right into a bin or different watertight container, and blend it with water. You wish to use roughly 3 times the quantity of water as soil, including it slowly, and stopping to combine the water in two to a few occasions. Soil can take up an absurd quantity of water; you need the soil moist, however not sopping. Seize a handful of the combination, and squeeze it in your hand. Does it clump collectively? In that case, you’ve acquired sufficient water. If not, add extra till it does.
Step three: Have a tray for the soil blocks
The blocks will dwell on a tray, and it doesn’t matter a lot what sort of tray, so long as it may maintain an inch or so of water, and is watertight. In the event you have been utilizing seed trays, they’d nonetheless want one thing to sit down on like a backside tray, so you’ve got seemingly acquired some round. I’ve seen setups with customary 1020 trays and setups with cafeteria trays. The blocks sit proper subsequent to 1 one other, so a 1020 tray can maintain 50 blocks. A cafeteria tray, relying on its dimension, can maintain way more.
Step 4: Arrange your dibbles

On the left, interchangeable dibbles, and on the precise, dibbles put in on the blocker.
Credit score: Amanda Blum
Earlier than we begin making blocks, you wish to arrange your dibbles. If you plant seeds, you must plant them on the proper depth, relying on the sort of seed. Sunflower seeds are buried very deep, as an example, whereas carrot seeds sit near the floor of the soil. Your seed blocker has totally different dibbles you possibly can add to your blocker, and so they’ll make corresponding indentations within the soil block, so you possibly can insert a seed extra simply.
Step 5: Begin blocking

Credit score: Amanda Blum
Now let’s get all the way down to precise blocking. Once more, in the event you’ve ever made a sand fortress, this received’t appear international, however the method requires a bit of finesse. Holding the blocker upright, push it into the seedling combine time and again, rocking it backwards and forwards, till you hit the underside of the bin. This pushes soil into the blocker. Swiveling the blocker left and proper whereas urgent towards the underside of the bin compresses the soil. After just a few passes, raise the blocker the other way up, and verify that the 4 chambers are full. If they are not, hold taking passes, or you possibly can simply hold the blocker the other way up and pack soil in together with your different hand.
Step 6: Line up the blocks on the tray

Credit score: Amanda Blum
To dispense the blocks, transfer to the tray that can maintain them. Push the blocker towards the tray, whereas slowly miserable the deal with and lifting up. This course of ought to product 4 good blocks, however that doesn’t all the time occur, and if a block appears like it’ll disintegrate, choose it up and toss it again into the bin. It’s simply soil; it’ll crumble aside. The blocks are delicate at this stage however not immovable, in the event you’re light.

Credit score: Amanda Blum
Now, begin throughout, and dispense extra blocks. Preserve going till you will have as many as you’d like on that specific tray. At this level, it’s time to plant some seeds. Deal with every block like a cell in a seed tray. Plant one or two tomato seeds, or a bunch of carrot seeds, or a single pumpkin seed. Cowl the seed up with some further seed combine.
Step 7: Seed the blocks
From right here on it, the method is rather like rising in seed trays. The soil wants warmth, so place your tray on a heated seed mat. The blocks want water, so it is best to fill the tray each few days with simply sufficient water to cowl the underside of the tray completely. The blocks will absorb the water and stay moist, guaranteeing germination. The seeds want humidity, so protecting the blocks with a plastic dome will guarantee there’s sufficient moisture. Lastly, the blocks want mild, so guarantee there’s sufficient mild on the tray, particularly after the seeds germinate.

Tomatoes grown in seed blocks
Credit score: Amanda Blum
The seeds will develop simply as they might in a seed tray state of affairs, and sooner or later, shall be too huge for the blocks. Alongside the best way you’ll wish to select one seedling per block, and lower the opposite seedling away. You may select to up-pot the blocks into containers or paper pots, or plant the blocks proper within the backyard, if it isn’t too early. Normally I up-pot the seedlings after just a few weeks, and so they’ll stay in four-by-four-inch pots till it is time for them to go within the floor. Blocks that don’t germinate for some cause will be recycled for subsequent yr by merely tossing the block again into the bin of seedling combine.